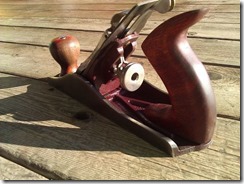
Ok, I know type 21 isn’t really a type, its actually the type after the last type, but then we know most types are a bit vague anyhow.
I am always a little saddened by some statements I hear about the later Stanley planes. Although some of it is justified, most of it can be easily overcome and all can be fixed to make a great user plane. I think overlooking these later planes leaves a whole set of possibilities off the table.
Some of the things I like about the later planes like the one pictured is they have a heavy sole. It’s cast heavy and has a heavy look and feel. These planes are also fairly abundant and can be come across fairly cheap. But not all is gleam and glory however, and this is the reason I say some if it is justified. I do like the older style laterial adjuster better, and the frog on the new style has a cheaper look and feel. That said, it will work once tuned.
I’m also not a big fan of the chromed cap, and I often strip the chrome if its in bad shape on any chromed cap plane. This one however was in pretty good shape, so I just polished it up and left it. If you find one with a lot of rust, a good wire wheel will remove it. Depending on your taste, you may want to strip it totally.
Also its worth noting that Stanley (or most manufactures for that mater) never made a plane that was ready right off the assembly line, so tune up is required on every vintage plane you find, and some may take some time. This was actually one of my more enjoyable restores.
The V shaped bars behind the frog kind of intrigues me. I know they are probably there to supplement a lesser quality cast, but it seems to serve the purpose of holding the tote straight as well. These only seem to be on the English made planes and add a little weight as well.
The other sad part is the knob and tote. Its pathetic as is and it just can not be fixed using the existing in my opinion.
But hey, we’re woodworkers. So for mine, I made a set from bloodwood.
I also decided to checker the tote. Now I haven’t had my checkering files out in about 10-15 years, so if you look close, you may find a few slight mishaps, but I was happy with the outcome. Note I also went bold and went straight to borderless.
I was also going to change out the knob and tote screw and the adjustment knob for the brass style, but after just a few minutes the metal came out just fine.
The rest is a normal tuning. I flattened the frog which didn’t take much at all. I flatten the sole, which also was extremely easy (much to my surprise). The iron was sharpened, the back flattened and polished and then put to work. The chip breaker was tuned and polished as with everything I tune.
________________ As an Amazon associate, we earn income from qualifying purchases when you click on a link. Your link clicks help us fund our website. ________________


