How to set up a Hand Plane
How to tune your plane is here —>
Writing a blog about How to set up a Hand Plane would take a whole series, because it really depends on what you are trying to do. In other words, a smoother will be different than a jack and so forth, but it even goes further than that. At what stage your planing with your smoother will make a difference also.
But here is a few tips to get you started, and I’m assuming this is for a smoother, so adjust as needed.
— Set the frog far. How you do this depends on the design of the frog, but make sure the blade can slide freely through the opening. Some plane designs allow you to slide the frog forward to close the mouth opening, but some leave to much of the plane unsupported and it may chatter. It’s best to allow the frog face and the back of the mouth to be perfectly inline at first. Let the chip breaker do the work.
— Set the chip breaker as close to the edge of the iron as your eyes allow, maybe a 1/16” or a smidgen tighter. Make sure it never goes beyond the blade if the blade is a little uneven or cambered. Here is a blog on setting the chip breaker. Different wood types work with different settings. trial and error will teach you the best setting for your wood and your plane.
— The cap should be as tight as you can make it and still easily move the iron up and down. Start loose and tighten it down until you feel the adjustment start to become harder.
— You always want to start planing with the blade retracted just above the mouth.
— Slowly lower it until its through. Use the lateral adjuster to make it even across the mouth.
–You can slide a thin piece of wood across one side of the iron then the other to make sure its even, or use your eye. As you practice, you will use your eyes more and more. Using your finger tends to cause bloodshed so its not recommended 🙂
— As you’re planing, if you see the iron is taking shavings on one side and the other, move the lateral adjuster toward the shavings, or the heavier side.
— Your first swipe should get nothing, but slowing lower the iron until it starts to take a shaving.
— Then just adjust accordingly.
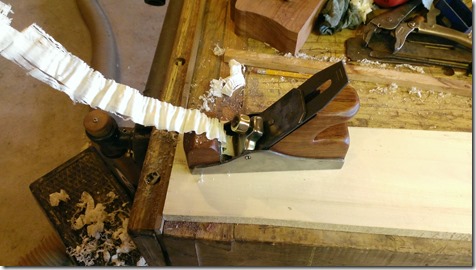
A thin shaving should look like this

–
– But remember that different wood react differently and you can get thinner or thicker depending on have much smoothing needs to be done.
– If the shavings comes out like sawdust, or you are pushing to hard to get shavings your iron is not sharp.
— If your iron is straight, even and the wood is straight grained, you get a even shavings across the cut, the full width, or almost the full width of the cut.
— The more your iron is sharpened with a camber, the less full width shavings will happen. That is often by design so not always a bad thing.
— Always start your stroke with the plane skewed to one side. It makes the cut more of a slicing action and allows a easier cut.
— Keep your sole waxed or oiled. The lubrication makes a big difference.
— Practice –Practice –Practice makes perfect.
________________ As an Amazon associate, we earn income from qualifying purchases when you click on a link. Your link clicks help us fund our website. ________________

